
As a new store owner, it can seem overwhelming and you might feel a lot of pressure to set up business information in the Merchant Center perfectly, but this doesn’t have to be the case! In this blog post, we’ll be getting rid of your worries by covering everything you need to know when it comes to completing your business information the right way
Your Google Merchant Center Account
The first thing you’ll need to do is sign up for a Google Merchant Center account and doing this is fairly straightforward.
- Step #1 – Go to the Google Merchant Center and click Get Started.
- Step #2 – Complete the sign-up by entering details including your store’s name and your main URL.
- Step #3 – Next, you will have to complete Google Merchant Center Shopify verification. We’ll be revisiting this in more detail later.
This sets up an essential account for running your Google Shopping campaigns and this is where we’ll be entering all of your Merchant Center business information.
Set Up Business Information in Merchant Center
When it comes to setting up your account there are two crucial steps that we mentioned – filling in some info about your store and verifying that you have ownership of the store. You can skip these steps initially but for a fully functional Google Merchant Center account, you’ll need to do them both.
About Your Business
There’s nothing difficult about this part. All you have to do is fill in the boxes and let Google know a bit about your business. Details like your store’s name, business address, and contact details are all needed, but your Google Shopping location is the most important piece of info you need to enter.
If you skipped this when you set up your account or need to update your business information later on, just sign into the AdWords Merchant Center and edit it through the Settings > Business Information page.
Verify and Claim Your Website URL
After you’ve gone through the first part of the setup and filled out your Merchant Center business information, you now have to verify that you’re actually the owner and claim it as your own.
Prefer learning from a video? Check out my recent video on Google Merchant Center Shopify Verification.
If you already have Google Analytics linked to your Shopify store and are using the same Google Account for the Merchant Center, you can prove ownership with a few clicks. Otherwise, you will have to insert a snippet of HTML code into your store’s header.
Don’t worry – this might sound complicated if you haven’t done a lot of HTML or CSS coding yet, but it’s extremely simple to do.
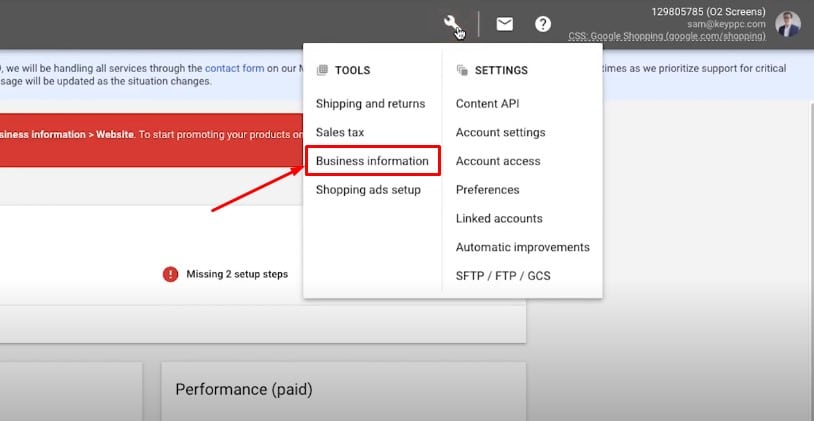
- Step #1 – Head over to the Google Merchant Center and click the Settings icon followed by Business Information.
- Step #2 – Click the Website tab and on this page, type your store’s domain exactly as is (including https://www) and press Save.
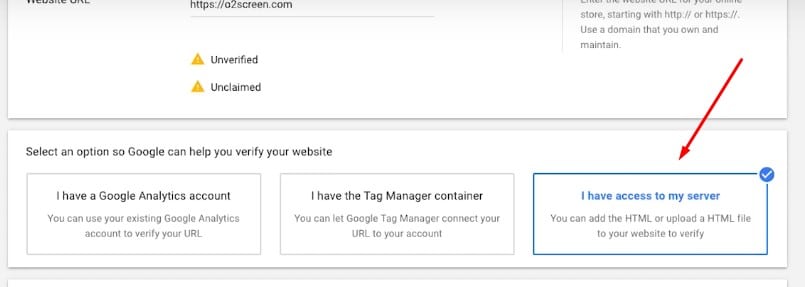
- Step #3 – You’ll now be shown 3 verification methods. As we said you can use your Google Analytics account if that’s already set up, but we’ll be using the I have access to my server option.
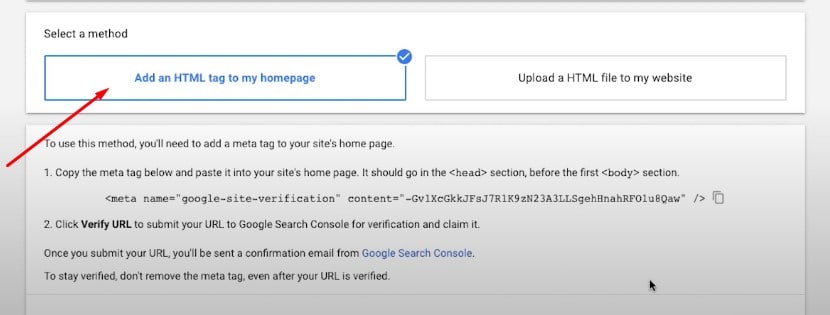
- Step #4 – After you click that option you’ll be shown two more options, this time select Add an HTML tag to my homepage.
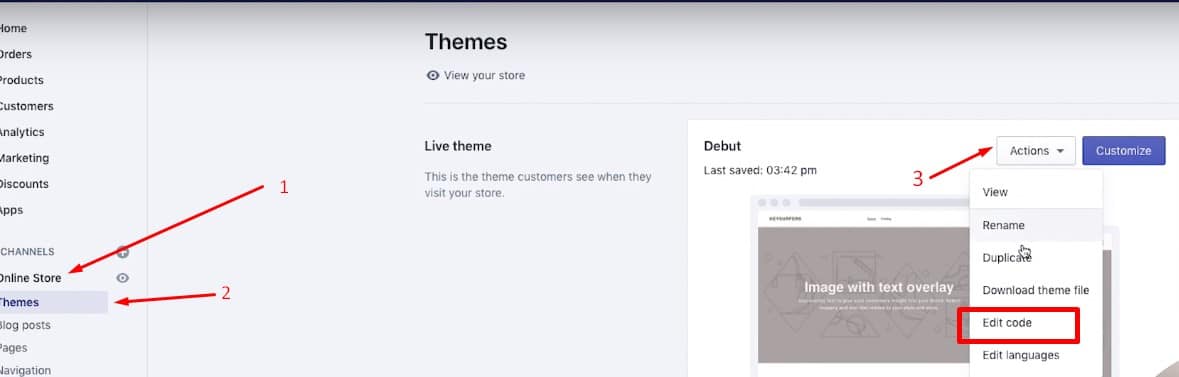
- Step #5 – Now go to your Shopify dashboard and click Online Store followed by Themes, then under the Actions menu select Edit code.
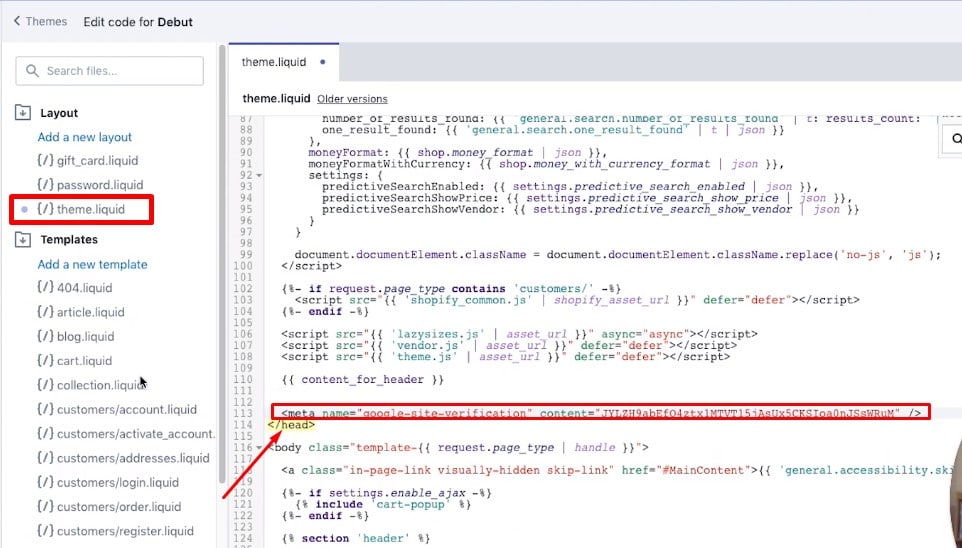
- Step #6 – From the list of theme files that are listed, open theme.liquid. Press the keyboard shortcut CTRL + F and search for </head> to locate the end of the header code.
- Step #7 – Right above where the </head> tag is, copy and paste the code that you were given on the Google Merchant Center and press Save.
- Step #8 – Finally, go back to the Google Merchant Center and click on Verify URL which will prompt Google to run a scan for the code.
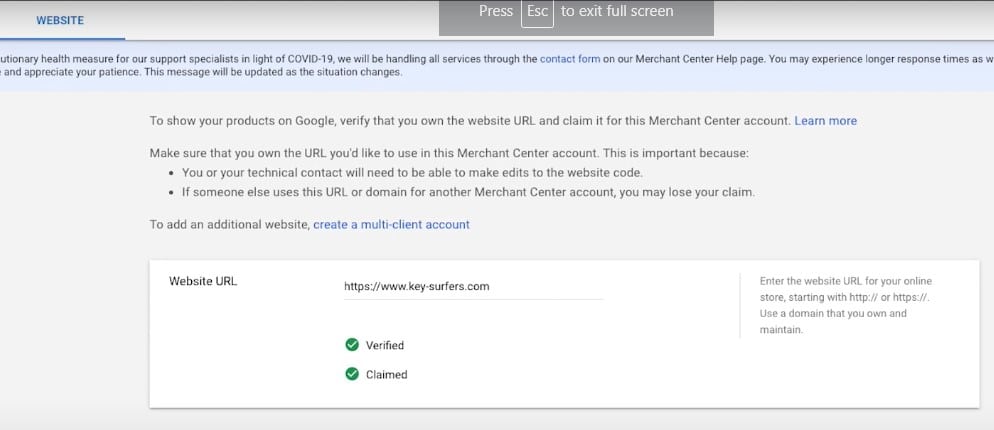
Bear in mind that after you add this code snippet to your website’s header, it may not update immediately. It could take up to 10 minutes for the live version of your store to update and for Google to detect it, so if they don’t detect it after you hit that Verify URL button, just try it again in a few minutes.
Watch the full Google Merchant Center Shopify Verification tutorial video below.