Among the tools that you can use are Google Merchant Center feed rules, and these are one of the most useful features on the platform that a lot of marketers often forget about.
There’s a lot of benefits to using them but most importantly, they’ll make maintaining your Google Shopping feed much easier. In this post, we’re going to be explaining how they work, when you should use them, and what they can do for you.
What Are Google Merchant Center Feed Rules?
Also known as Google Shopping rules, these are basically a way that you can manage and make changes to your product feed without having to overpay for an expensive (and often needlessly complicated) piece of software.
Tasks like automatically adding custom labels to your products or tagging them with shipping labels can be done, but there are a lot more uses.
There are two parts to a rule: the condition and the application. The condition is how you determine which products you want the rule to apply to, and the application is what you want to happen. If you’re familiar with basic programming, the IF/THEN/OR functions are exactly how this process works.
When and How to Use Feed Rules
As soon as you’ve completed the Google Shopping feed setup and you’ve uploaded your detailed product feed, you can start using the feed rules. It takes some getting used to and they can seem very complicated at first, but if you understand how beneficial they are it really is worth taking the time to set them up.
How to Add a New Feed Rule in Google Merchant Center
So, how do you go about adding a new rule? Here’s how to setup Merchant Center feed rules:
Step #1. Sign in to your Google Merchant Center account then click Products > Feeds from the sidebar menu.

Step #2. Click on whichever product feed you want to add rules to and go to the Feed Rules section. If you’ve never used them before, take a moment to understand the feed rules examples that Google has listed here.
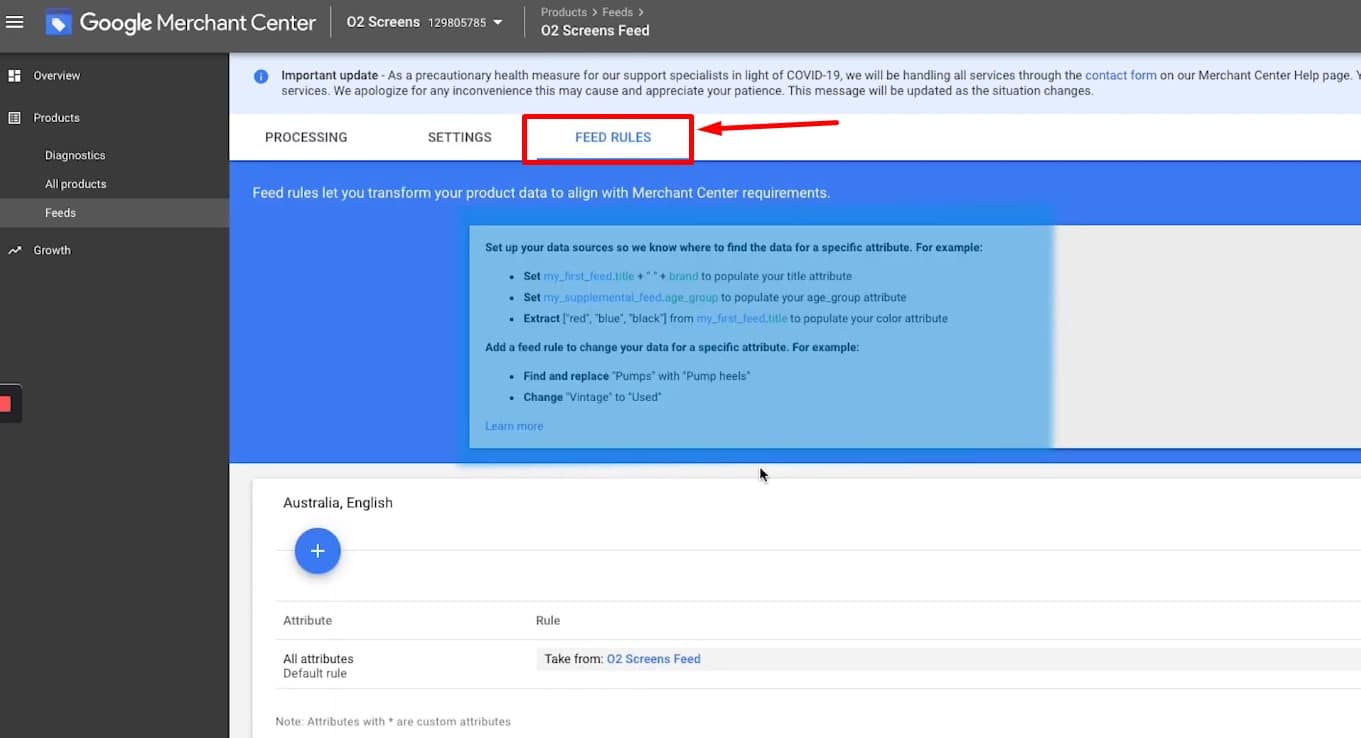
From this page, you can add a new feed rule by simply clicking the + button. One piece of advice: know what your goal is before creating a new rule. If you know what exactly you’re trying to achieve by making a new rule, you can take a step back and consider what the best rules to use to reach that goal are.
What You Can Do with Feed Rules in Merchant Center
There are a vast number of ways to use Google Merchant Center feed rules but we’ve picked out 5 of the most common tasks they're used for.
1. Change Product Titles
A great use of Google Merchant Center feed rules is to change product titles without having to do it manually. Let’s say your feed is imported from Shopify and it has all the product titles, but you want to add the brand name to the title (this can help with getting more clicks since people will often include the brand name in their search). Instead of editing each title, here’s how you can create a rule which adds the brand to each of the product names:
Step #1 – Head to the feed rules section of the product feed you want to edit as we showed above.
Step #2 – Click the + button and select Processed Attributes. From the list of attributes, scroll down and select title.
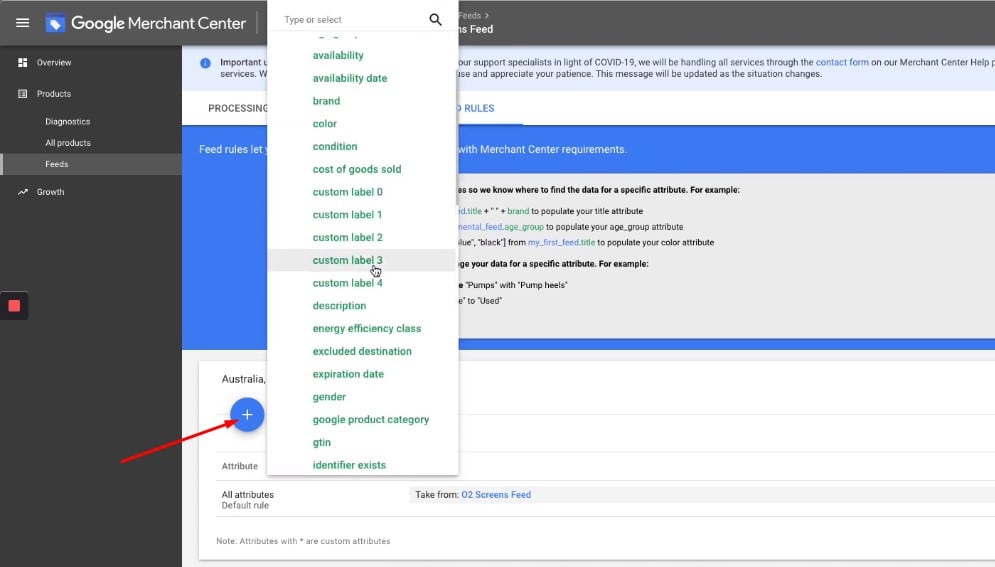
Step #3 – The next page will prompt you to add conditions for your rule (what triggers the rule?). This will depend on various factors, like which products you want to edit and how you want to edit them, but here’s our example.
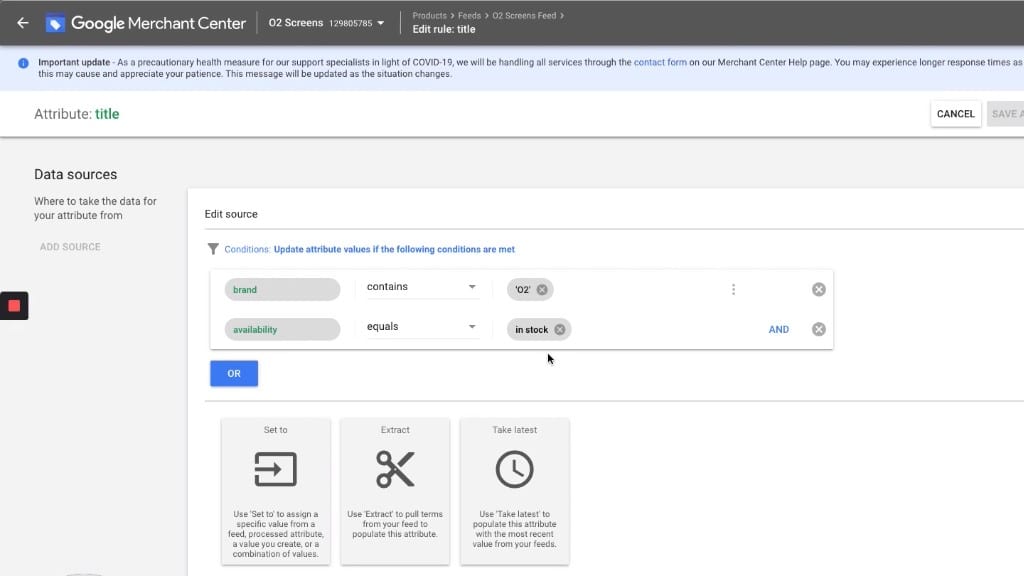
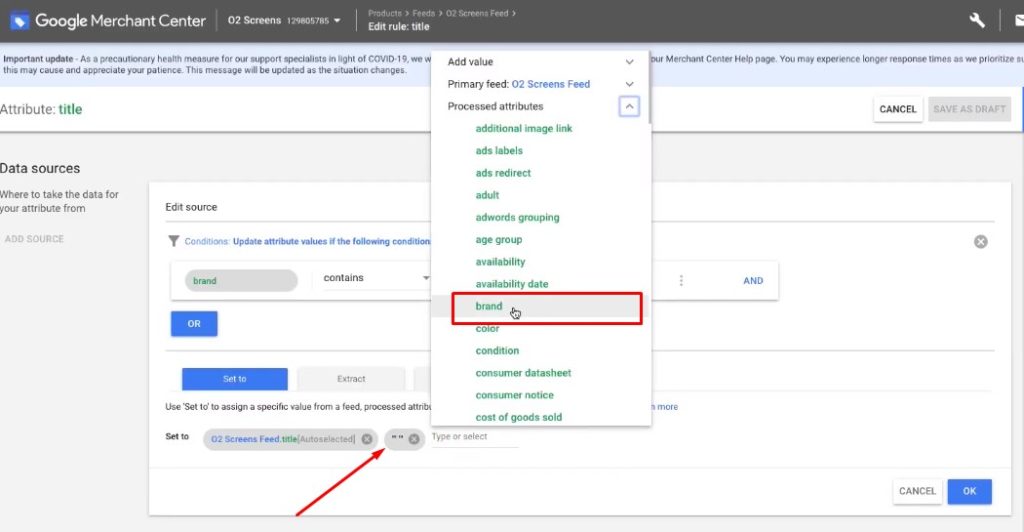
What does this mean? IF the brand of a product in our product feed is O2, THEN our rule will be applied to that product.
Step #4 – Now that we’ve created a condition that selects which products the rule is for, we can say what we want the rule to do. In this case, click Set to and choose Automatically selected attribute for title.
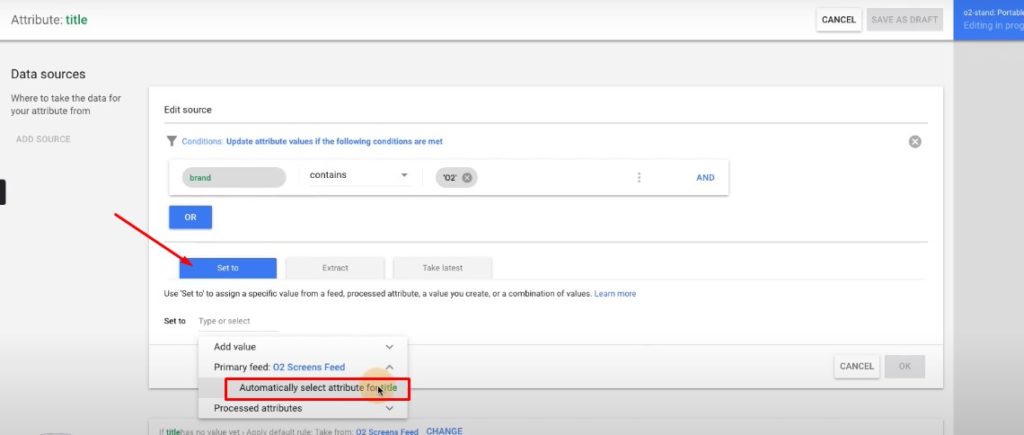
Step #5 – Next, we’ll add “ “ to put a space between the product title and brand name. Then for the last value, go to Processed attributes and select brand.
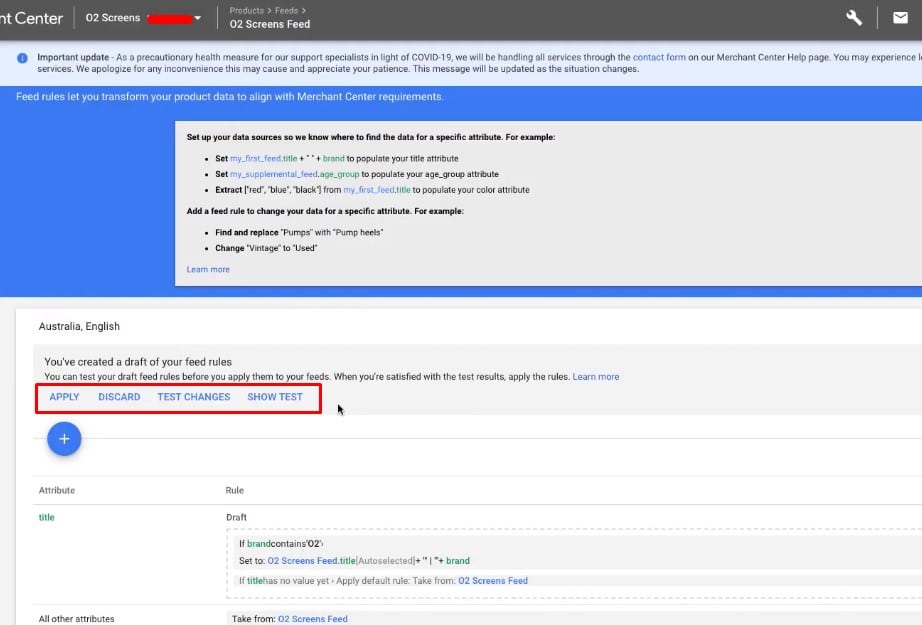
Step #6 – When you’re happy with the rule, click OK and then Save as Draft. Rather than pushing your Google Shopping rules immediately, Google gives you the chance to see how they’ll affect your feed beforehand. If you click on Test Changes you’ll be shown a preview.
Step #7 – After running a test, Google will give you a report which you can review to see how the rule changed your product feed. This allows you to make changes to the rule if it didn’t have the effects you hoped for.
Step #8 – If you’re satisfied with what the rule does simply go back to the feed rules page and click Apply to use it.
2. Keyword Optimization
You might complete the Google Shopping feed setup only to find that there are better keywords you could be targeting. As such, to adjust your feed and target a new keyword, you can use a feed rule to add that keyword to the relevant product titles.
Step #1 – Go to the feed rules section of whichever feed you’re updating and click + followed by Processed Attributes, and select title.
Step #2 – Create the rule according to the products which titles you want to have updated. In this case, our rule again focuses on products that are O2 branded and which are currently in stock.

Step #3 – Next, select Set to and choose the automatically selected attribute (which should be title).
Step #4 – In the second box, type the keyword that you want to be added to the selected products.
Step #5 – Click OK then Save as Draft, and quickly test your rule to make sure it makes the intended changes before pushing it to be live.
3. Extracting Clothing Colors
If you’re selling clothes then it’s not uncommon for people to add the color of the clothing at the start of the product title. However, this is a common reason for Google not approving a product feed. Fortunately, it’s a quick and easy fix.
Step #1 – Open the product feed and go to the feed rules, and click + to start creating a new rule.
Step #2 – Select Processed Attributes and this time click on color.
Step #3 – Add a condition if you only want to change the titles of certain products. For example, you can choose a specific brand to change (however if the rule applies to all of the clothes in your feed, you can skip the condition).
Step #4 – Select the Extract option and for the source, make sure you select the correct feed.
Step #5 – In the window that appears, set the Attribute name as title and click OK.
Step #6 – Type all of the colours that are in your product names in the keywords box, putting each colour on a separate line.
Step #7 – Save the rule and test it before you run the live version of it and update your product feed.
4. Changing Products’ Conditions
In some cases, you will also need to distinguish the condition of your products. For instance, you might have accidentally listed one brand of products as used when in fact they’re new, and you could remedy this with these steps.
Step #1 – Go to your product feed rules, click + to create a new rule, select Processed Attributes, and select condition.
Step #2 – Again, you aren’t required to have a rule condition here if you are changing the condition of all your products. But since we want to update just one brand, we’ll create a condition which selects just O2 branded products.
Step #3 – Click the Set to option and choose new from the list of conditions.
Step #4 – Save the rule, run a test to be sure it works fine, and apply the rule.
5. Updating Shipping Costs
Undoubtedly one of the most useful Google Merchant Center feed rules is updating your shipping costs. Shipping rates fluctuate all the time so if you find out that you’ll have to pay a different rate, or you switch to another distributor, put this rule into effect and you’ll save a bunch of time.
Step #1 – On the product feed rules page, click the + button to add a new rule, click Processed Attributes, and select shipping.
Step #2 – Add a condition depending on the products that you want to update the shipping costs for. One attribute that generally reflects on the shipping costs is shipping weight, so you could create a rule that applies to products heavier than a specific weight.
Step #3 – Click Set to and change the shipping cost to whatever your updated rate is.
Step #4 – After you click OK and save the rule, test it to confirm your rule had the desired effect before applying it to your product feed.
Use Conditions
Conditions play an important role in feed rules in the Merchant Center. Like we explained before, you don’t have to have any conditions – without a condition, the rule will be applied to every product in the product feed.
However, a condition allows you to only change the data for certain products (e.g. only one category of products).
Always Test Rules First!
This needs to be emphasised because it’s an important stage when you’re learning how to setup Merchant Center feed rules. It’s very easy to overlook a minor error in a condition you create or the changes that the rule inflicts, but running a test can catch these errors.
After you make a new rule all you have to click is Test Changes like we showed you in the first method, and a few minutes later Google will send you a report that shows what changes were made as a result of the rule.
If you skip this step, these changes would be made and there would be no way to reverse your changes without uploading new product feed data.
Weigh the Pros and Cons Before Using Merchant Center Feed Rules
Obviously there are a lot of times where Merchant Center feed rules can be handy, but there are some cases where it might not be the best option. Use these pros and cons to help figure out whether you should be using feed rules.
Advantages
- Provides an automated solution for managing product feed data in bulk
- Very easy to use with barely any technical understanding required
- Completely free to use unlike the alternative of purchasing an enterprise solution
- If any products are added to the product feed in the future, the rules are applied to those new products
- If a product feed is declined by Google because it doesn’t meet the Google Merchant Center feed specifications, most changes to the feed data can be made with a simple rule.
Disadvantages
- There are limits to what feed rules can do (updating SKU labels in bulk is much harder to automate with a rule)
- Rules are specific to each product feed so if you have multiple feeds you may need to create rules several times.
A Major Lifesaver
Hopefully, now you’re comfortable with using feed rules so that you can use them to better optimize your Merchant Center feed. For tasks like the ones we’ve shown you above, where a lot of manual effort would normally be required, these are a lifesaver to use. On top of that, they save you the expense of costly enterprise software which basically does the same thing anyway. Sure, in rare cases you won’t be able to apply a rule but for the most part, you’ll find these rules to be abundantly helpful when it comes to maintaining your product feed!


