In this article, I will show you how to upload your Google Merchant Center feed using Google Sheets. It’s easy. It’s fast. It’s a life-saver! Get your product feed imported quickly and efficiently.
Product Feed Requirements and Data Specification
The product data specification can be used to format all information for Merchant Center, Shopping Ads, and Shopping Actions. It's very important to submit your product data to Google in the correct format so that you can generate optimal ads and listings for all your products. This data is then used to match up with user queries about specific products, and that's how your products will be found by consumers. Here are the attributes you will need to have to get your product feed approved:
- Basic product data – This information will be used to create ads and listings for your products, and that means it needs to be of the kind of quality you want your customers to see. Some of the individual elements included here are the ID, Title, Link, Description, Image Link, and Mobile Link.
- Price and availability – Pricing data and Availability are attributes shown to potential customers who are searching for products like yours. When there are frequent changes to pricing and/or availability, you'll need to keep Google updated on these changes, so that customers are always seeing the most current information about your products. Some other data elements which can be included here are availability date, expiration date, sale price, sale price date, loyalty points earned, subscription price, and information about installment plan purchases.
- Product category – Product categories are primarily useful because they help to organize data into convenient groupings for any advertising campaigns which you might initiate in Google Ads. If you don't specify categories for your products, Google will attempt to assign default categories to them, and these may not be as accurate as you'd like them to be, so it's worth your while to take the time and assign actual categories to your products. In many cases, the category will simply represent a specific type or sub-classification of any broader grouping, and in this way, categories can be taken down to a very granular level.
- Product identifiers – These will help to identify your specific products in the broader context of the global marketplace. These identifiers help Google understand exactly what it is that you're selling, and that in turn will allow them to boost the performance of your ads and listings. Important details can be added in with your product data, and all this can be presented to potential customers, who will thus have the most information possible about your products.
- Detailed product description – included in the detailed product description are some of the specific attributes which users commonly search for. This detailed description will give you greater control over how your products are presented to users, and it can help to narrow your target audience to those most likely to buy your products. For instance, this data might include the product's condition (new or used), whether it's bundled or multi-pack, the age group it's intended for, color, gender, material, pattern, size, and other technical details.
Steps to Create and Upload Your Feed to Google Merchant Center
To upload your feed to Merchant Center using Google Sheets, you have to manually enter your product data. But you don’t have to worry because Google Sheets gives you full control over the product information you upload and works similarly with Excel spreadsheet. This process can only take 10 to 15 minutes to complete so if you’re ready, just follow the steps below.
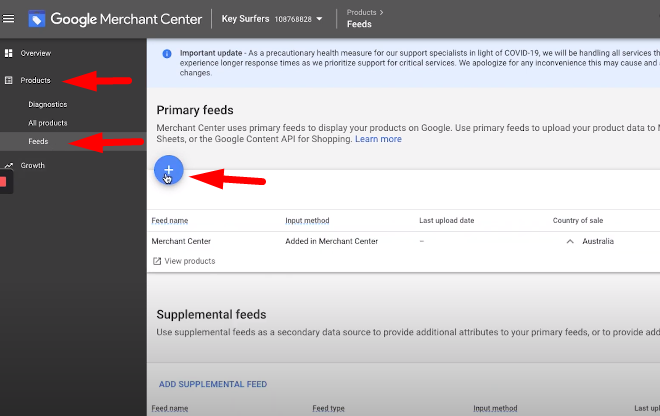
STEP 1: Go to your Google Merchant Center dashboard and navigate to Products > Feeds, then click the blue “+” sign as shown below.
STEP 2: Enter your Country of Sale and Language, then Destinations should be Shopping Ads. Click CONTINUE.
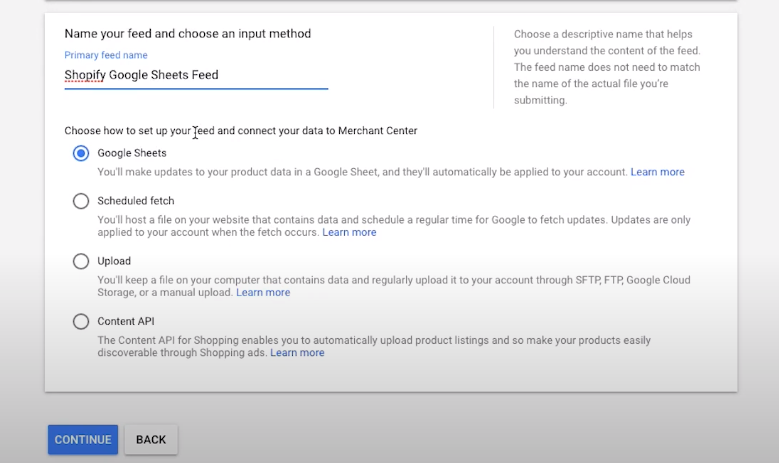
STEP 3: Name your new feed and choose Google Sheets as your input source. When you click CONTINUE, you will then be asked to sign in to your Google account.
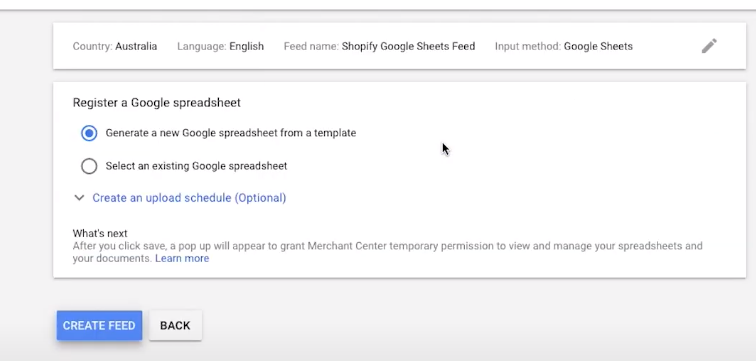
STEP 4: Uncer Register a Google Spreadsheet, choose “Generate a new Google spreadsheet from a template.” Then click CREATE FEED.
STEP 5. Wait for the Google Sheets file to be created. Once it’s created, you can now open the file by clicking the link.


STEP 6: Next, go to your Shopify store to EXPORT all your products in a CSV file.
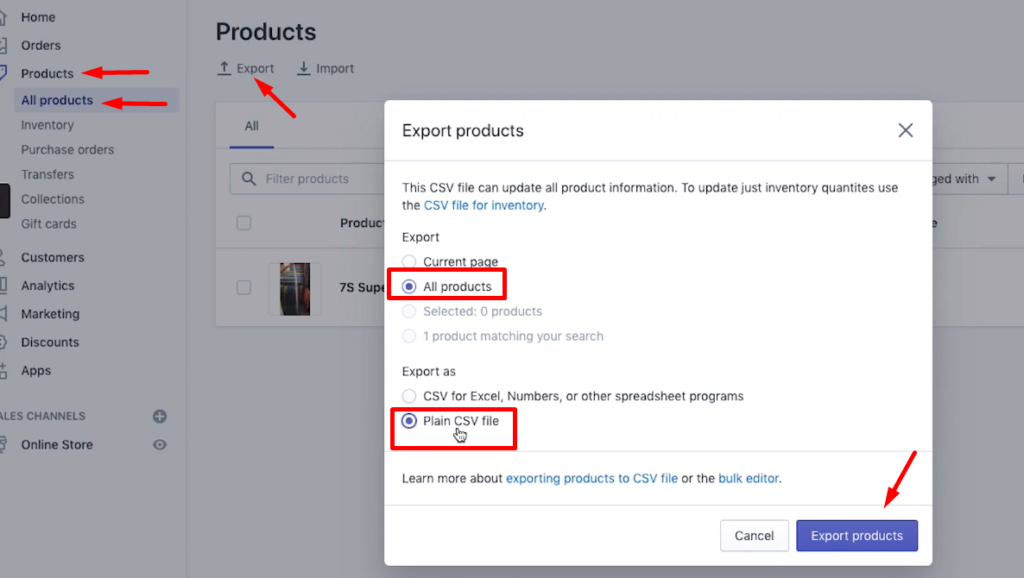
The file will then be sent to your email as a link that you can download. Once you download the CSV, you can open it using Excel spreadsheet or any similar program you have.

STEP 7: Copy all the data from the CSV file, as shown above, and paste it into the Google Sheets spreadsheet you have created.
STEP 8: Organize your product data in the format that Google approves. You can easily do this by matching the product data exported from Shopify with the items in the columns from your Google spreadsheet.

STEP 9: Once your product data is ready, go back to your Google Merchant Center account to FETCH the feed. Just go back to FEED, then click the Google Sheets feed.
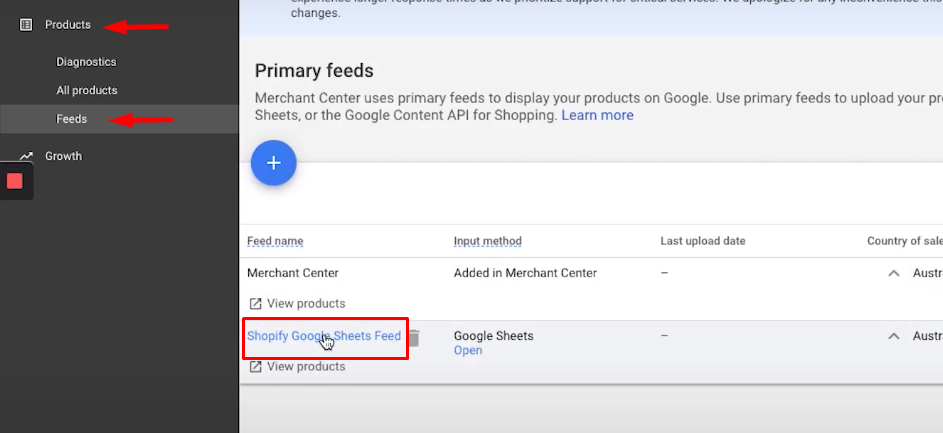
STEP 10: Click FETCH NOW and wait for the feed to be processed. You can also refresh the page every 2 to 3 minutes to immediately check if the feed has already been processed.

If the feed is not approved, Google will tell you what the errors are. But don’t worry because these errors can easily be fixed. The example below shows that there is an error in the currency used in the Google Sheets feed. If this happens, you can Google the error to find how to fix it, then just update the feed and re-fetch it in your Merchant Center account.

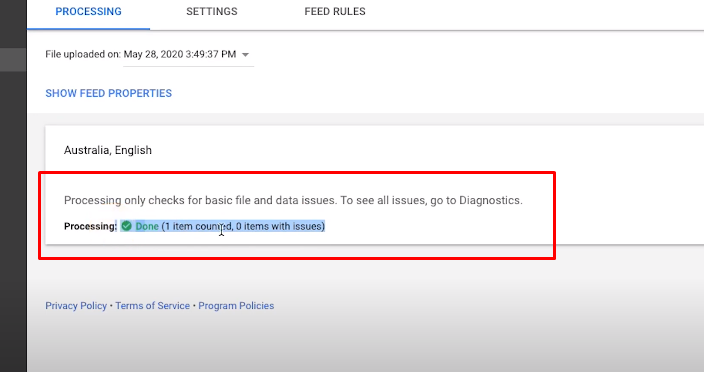
Once all errors have been fixed and your feed has been re-fetched, you will then see that your Google Sheets feed is ready for APPROVAL. You just have to wait for 2 to 3 days for your feed to be ACTIVE.
Tips to Optimize Google Shopping Feed
To optimize your shopping feed, you should start with optimizing your titles and using various keywords in them to see which produce the best results.
Next, most store owners don't think to optimize their color attribute, but this really can make a difference. When Google crawls your landing pages and tries to match the color with your feed data, you'll get disapprovals if there are mismatches – so use the legitimate color in both places.
If you have a site where pricing data changes frequently, you should make use of a dynamic pricing tool to keep up with the changes, and such tools can be found easily on the Internet.
Additionally, don't forget that the first thing users will see about your products are the associated images, so make sure these are top quality and are very representative of your products.
Make use of sales and merchant promotions liberally because these always produce higher click-through rates and lower cost per conversions.
Conclusion
Uploading data to your Merchant Center can be a very quick and painless process, especially if you take advantage of some of the built-in procedures provided by Google for the purpose. You always want to put your best foot forward in Merchant Center, because that's where the data comes from which potential customers will see. So take the time to get this step right and you'll be much more likely to reap the benefits of your efforts.
Want to get more Ecommerce tips and tutorials just like this? Subscribe to my YouTube Channel and learn more about growing your Ecommerce store remotely.


